Overview
The WooCommerce Payment Plans for Subscriptions plugin allows you to add payment plans to existing products, so customers can choose to pay using a payment plan rather than pay in full. This gives customers the option to pay an upfront fee and the remainder at a later date while dividing payments into multiple parts over time.
Table of Contents
1. System Requirements
WooCommerce Payment Plans requires that you have installed the following:
2. Installation
To install WooCommerce Payment Plans for Subscriptions, do the following:
- Purchase the WooCommerce Payment Plans plugin.
- Download
woocommerce-payment-plans.zipfrom your account. - Go to WordPress Admin > Plugins > Add New and click Upload Plugin. Then, provide the file that you downloaded with Choose File.
- Finally, click Install Now and Activate the extension.
3. Product Data Settings
Adding a Payment Plan
After selecting a product from your store that you want to apply a payment plan, edit the product and click the Payment Plans tab. Then, click Add Plan.

Billing Interval, Length, and Price
Next, choose the Interval, Length, and Price of your payment plan.
- Interval: From the dropdown lists, choose the interval duration, which includes day, week, month, and year, and how often you want to bill.
- Length: From the dropdown list, choose the billing plan length. For example: 1 month, 2 months, or 3 months..
- Price (Price per Installment): Enter the price that you would like to charge per installment. For example, if the product costs $1,000, and you have set up 4 installments, the price per installment would be $250.
Finally, click Update to save your changes.

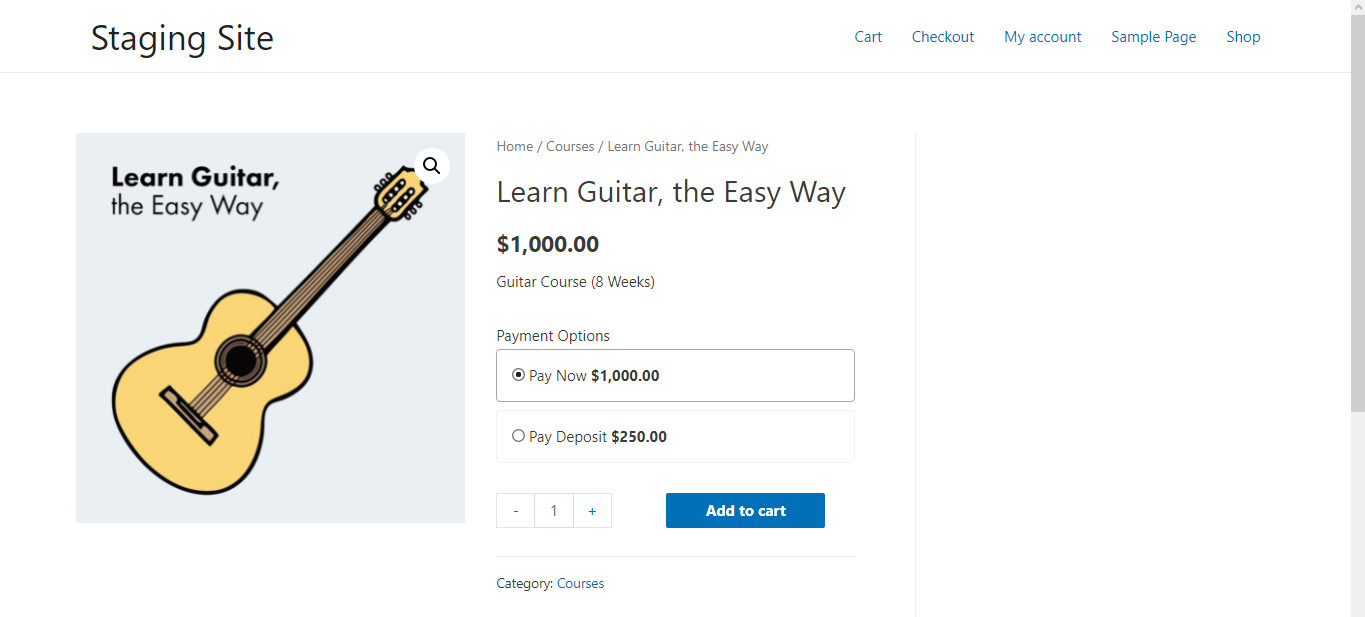
In the above example, I have added a payment plan to a $1,000 virtual product, in which I will charge a customer 25% up front and the remainder over 3 months (4 total payments). I chose to charge every month for four months, so there will be 4 total payments.
To see your changes, click Preview Changes, and you should see something like this:
Subtext
By default, if nothing is entered into the Subtext field, it will display the following on the product page: “X interest-free payments” or, in the example below, “4 interest-free payments”.

However, you can change this to your own text by using the Subtext field if, for example, your product or payment plan needs better explanation. Below, I’ve changed the Subtext to “today (followed by 3 monthly payments of $250.00)”.

After clicking Update and Preview Changes, the new subtext will display like this:

Description
You can add text to the Description field if you would like to better explain your product or payment plan. For example, below I added: “Pay 25% today and then the remainder over 3 interest-free payments”:

After clicking Update and Preview Changes, the new description will display like this after the user clicks on the Subtext dropdown list:

One-time purchase
When you a add a payment plan, by default One-time purchase is enabled.

If a product has both a payment plan and has One-time purchase enabled, the product page will have both options, like this:

If, however, One-time purchase has been disabled, the product page will look something like this:

Default to
If you have One-time purchase enabled, you can further select the default option on the product page from the Default to dropdown list, as shown below:

If you set Default to to “Payment Plan plan,” the following display on the product page when it loads:

4. Cart & Checkout Screens
After your customer adds a product with a payment plan to the cart, the Cart page will display information about the payment plan, so that they can better understand what they are buying. In the example below, I’ve added the same product twice. Once as a one-time purchase and once with a payment plan:

After you customer clicks Proceed to checkout, the Checkout page will display:

Please note the following terms in the checkout totals:
- Total Due Today: The amount of money owed today.
- Future Payments: The remaining amount of money owed on the payment plan.
- Next Payment: The date of the next installment .
5. General Settings
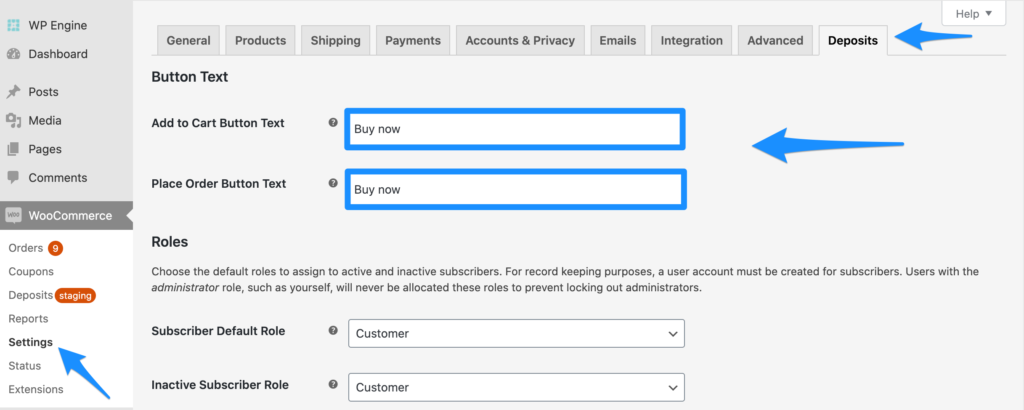
To go to the General Payment Plan settings, navigate to the following: WooCommerce > Settings > Products > Payment Plans.
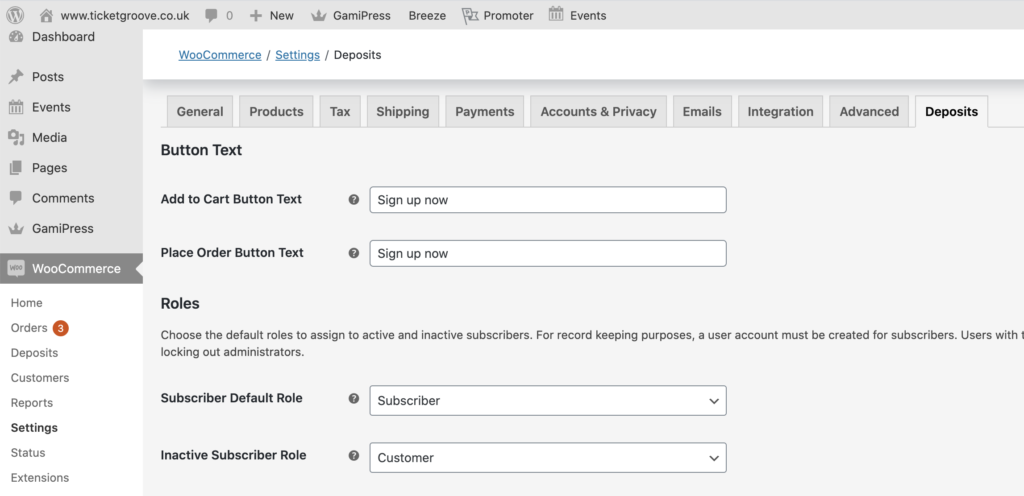
Button Text
By default, the button text label is “Sign up now”. To change the button text label, update the text to “Buy now”, and then scroll to the bottom of the page and click Save changes.
6. Questions and Feedback
If you have purchased WooCommerce Payment Plans for Subscriptions and are experiencing an issue, do the following:
- Make sure that you have the latest versions of WooCommerce and WooCommerce Subscriptions.
- Go to WooCommerce > System Status to check for plugin updates and other important information that may require your attention.
- Rule out a plugin conflict by turning off all plugins except WooCommerce and WooCommerce Subscriptions. If the issue is then resolved, find the plugin that triggered the issue by reactivating your plugins one by one.
- Rule out a theme conflict by activating a default WordPress theme and checking if the issue still occurs. If it doesn’t, please contact your theme author(s).
- Check Frequently Asked Questions.
If you followed these above steps but are still experiencing problems, contact us at support@sgwebpartners.com.